UnCorked
  • Home
  • The Blog
  • Who and Why
  • Contact Me

Brrrr! You want to grow grapes where?

4/26/2013

0 Comments

 
As we move into spring (though Chicago won't let you believe it,) and grapevines all over the northern hemisphere start to break buds and become active again, it gets you to thinking… Wine grapes are grown in lots of climates where it seems like they shouldn’t be- so how do they do it? How do grapes survive in chilly places like Germany, Austria, New York, and Michigan? If you’re a brave soul trying to plant grapes there, what sorts of things can you do to help?

Well, there are lots of different factors that come into play when it comes to agriculture in general. The first is the concept of a Growing Degree Day. This is basically the measurement of the heat available for growing plants in any given region.

Grapevines have their own GDD requirements, and this varies based on cultivar and even species of grapevine. Before planting a vineyard, growers should look up the GDD for their region and pick their grapes accordingly.

So which vines do best in the cold? Well, remember when we talked about some native American grapevine species being less susceptible to phylloxera? Well, some are similarly better equipped to deal with cold climates and fewer Growing Degree Days. Some vinifera (European) grapevine cultivars are also better equipped than others at dealing with the cold. This includes varietals like Riesling and Cabernet Franc (Chardonnay does ok in cooler climates too.)

However, what if you really don’t want to make wine from Native American grapes? Well, there are hybrids that have been bred between vinifera and native American cultivars with traits like cold hardiness being a prime selection factor- these often have been selected to taste less like the American varietals and more like the vinifera. However, many of them wind up with a pretty heavy vegetal, grassy flavor in whites, and what is referred to as a “foxy” flavor in reds (think of that distinctive concord grape flavor.) So… What else to do?

Well, remember grafting? Some growers will use vinifera plants grafted onto cold-hardy rootstock, depending on their region. Now, these aren’t a guarantee, as the upper part of the vine is still a European cultivar and therefore more susceptible to cold damage, but the below ground portion of the plant will tolerate freezing and bitter cold much better, which can sometimes alleviate some problems.

But, what else?

Well, in some climates, the growers will actually take the vines down off of their growing wires (if you’ve ever seen a vineyard, you’ve likely seen that the vines are trained up onto trellis wires- this is to maximize airflow and sun exposure) and then bury them in the soil for insulation during the winter. This will often protect the plant in that its sensitive buds are protected from the bitter freeze, but it is not always practical as it is extremely expensive- not only do you have to pay someone to take them down and bury them, then they have to dig them back up and re-train them to the wires in the spring (and you can’t outsource that delicate labor to a machine- pure manpower there!)

Watering at the right time after harvest can also help protect the roots from a terrible freeze. The water gets in there and insulates, but you also don’t want to overwater as this can send the wrong message to the vine and delay it from shutting down for the winter!

Site location is also a key factor. Even regions with plenty of GDDs can find themselves in a freezing bind. If your site has gullies or areas where cold air can pool, you can wind up freezing and damaging only a portion of the vines. In which case, it is best to not plant grapes at the bottom of these areas. Planting on a slope so that cold air can sink down and away from the grapes is a smart idea in cool/cold regions. And it is common for vineyards (including many in eastern Washington) to include wind machines to keep things moving in the winter. They’re expensive and do use electricity, but they’ll at least keep the air flowing and from settling and freezing out your plants.

As a side note, the majority of the grapevine structure actually CAN take a lot of cold- it is really the damage to the buds that is crucial. If the buds are damaged down to the innermost point, there’s pretty much no going back and you can lose years and years of growth. Sometimes the vine can be saved by cutting it all the way back to the ground and re-growing it from shoots at the base- in some cases, growers have to pull the entire vine out. Either way, it is a real bummer!

Bodies of water also can provide an insulating effect to vineyards and keep the climate a little warmer than the areas farther from the water. In southwest Michigan, the moisture and warmth retained from Lake Michigan provides enough of a buffer that many vinifera grapes can do pretty well. This is also true of the Finger Lake in upstate New York, and the Loire River in the Loire Valley. Definitely something to bear in mind if you’re looking for vineyard land!

So, while it is often a real fighting battle to grow grapes in cold or cool climates, with the right vinifera cultivar selection, the use of the proper rootstock or hybrid grapes, proper airflow and drainage, and the selection of the right site (no, grapes can’t truly grow anywhere…) then you can bravely wade out into the realm of cold climate viticulture.

Good luck!

Did you know?

Global warming is having a pretty noticeable impact on viticulture. Areas that used to be perfect for one cultivar are having to change their vineyard management strategies to deal with the increasing heat- some are even tearing out and planting different varieties. Conversely, areas that were once not suitable for grapes are becoming more and more desirable. Slate Magazine suggests Montana will be the new viticultural hotspot. Anyone wanna invest with me?
0 Comments

Wine Descriptions Are BS? Wait, What?

4/21/2013

2 Comments

 
Today I read an article from The Telegraph describing a study in which tasters rate the usefulness of wine descriptors. Many of the participants found them to be extremely unhelpful and pretentious! For the most part, I actually agree with their perspective and with the point of the article, but only up to a point... 


Sometimes, adjectives used to describe wine can be pretty ridiculous and clearly were invented by snobs who wanted to make other people feel dumb and make themselves feel superior. Either that, or they were written by really unimaginative PR sorts who ran out of adjectives and their word processing thesaurus was of no help. Things like “old bones?!” WHAT? Bizarre. Agreed. Wine should not taste like old bones… What do old bones even taste like? How do I go about finding some to taste? Do I even want to?
“Brooding?” C’mon. No one can taste “brooding.” Brooding is not a thing. That’s dumb.

However… (could you tell this was coming?) there are several that they list here that I disagree with and use personally all the time… Does this make me a snob? Take “vegetal” for instance. I like this one! We all know what vegetation tastes like, right? It may not be as specific as “grass” or “asparagus” or “spinach,” but we all know a vegetabley flavor when we taste it. Next is “leather.” OK, so maybe I don’t go around sucking on or eating leather. But I think I know what it tastes like- it’s very closely related to the smell of leather (and smell and taste are so closely related anyhow!) C’mon!

Minerality? Well, that one could go either way. I always think of minerally flavored wines as having a sort of calcium or limestone flavor. But, I grew up with really hard well-water, so maybe I have a special bent on that one.

What do you think? Have I crossed over into snobbery? Is my growing familiarity with wine descriptors tainting my view? I feel pretty committed to the idea of keeping wine non-snobby and laid back, so this is important! Bring me down to earth, friends!

Share your thoughts in the comments (please.)

2 Comments

Wine Kit 4: Bottling!

4/16/2013

0 Comments

 
About a week ago, I decided to test the pH of my Pinot Blanc using some litmus strips (you dip them in wine and they change colors based on its pH) I got at my local brewing/winemaking shop. They’re not highly accurate, as they really only give you a general range, and you’re just checking the color on the strip against the colors on the bottle, but it’s better than nothing, and I’m not to the point yet where I can afford or have room for my own little lab. The strips placed it at about 3.4 pH which is right where it should be (I even tested a commercial dry white, just to make sure I was reading the colors correctly.) This acidity made me wary of my original plan to play with some citric acid additions. I was confident it was ready for bottling as is. 

I got super busy this past week and didn’t have the chance to get it bottled as I’d hoped. I finally had several hours at home on Sunday afternoon and decided to give it a shot. However, I wanted to make sure I liked how the wine tasted before I committed to bottling.

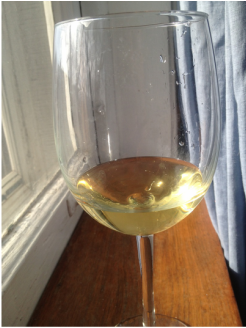
I cleaned and sanitized my thief and pulled a half glass. The color was a lovely bright yellow and it was crystal clear. The nose, as with my past kits, is pretty sweet and fruity smelling and I anticipated it would taste similarly (the other 2 kits were pretty true to their smell.) However, this one was much drier and more tart than the Sauvignon Blanc I did last year. It is almost too tart for drinking on its own- but I have a hunch it’ll mellow in the bottle and will be very good with food. However, definitely no acid additions are necessary!

Picture
Look at that lovely color and clarity!
As a side note, the wine smells and tastes a little dusty to me- this was also true of the other kits I have done, and I suspect it is due to my inability to filter the wine (I just don’t have the equipment.) I think what I’m detecting is the bentonite clay, which is added to clarify and pull out suspended solids from the wine. The good news is that it seems to dissipate with time. So I’m setting a few aside specifically for cellaring and will evaluate how they come along as time passes.  

I also realized that because I had let the kit go much longer than the instructions recommend (stupid busy schedule,) I needed to add a little bit more SO2. This will prevent oxidation in the bottle as well as keep any yeasties or bacteria at bay.
I checked the recommendation for the campden tablets I have on hand and added just one to get the right level. (I prefer using powdered potassium metabisulfite, but this is what the local store had, so I went with it. I'll get powdered again next time...)

Anyhow, on to bottling!

Getting the wine into bottles took me a little longer this time than anticipated because I wound up sloshing my carboy around a lot getting it onto the table. (My hands were slippery and I was terrified of dropping it, so it took a few tries, darn it. Plus, I’ve been neglecting the gym and am turning into a weakling.)

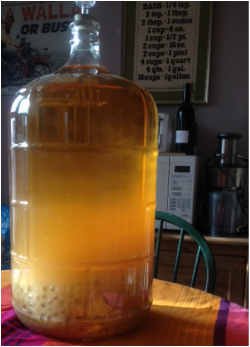
This meant that I stirred up a lot of the bentonite clay in the bottom and the previously crystal clear wine got cloudy. I then had to wait for it to settle out overnight… Bummer.

Picture
You can see how clear it is at the top and how cloudy and mixed up it is at the bottom... sigh...

Read More
0 Comments

Taste Along #1: Chardonnay

4/12/2013

2 Comments

 
Picture
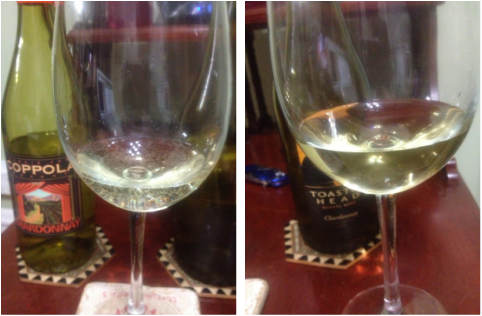
On the left, we have the unoaked Coppola, and on the right, the oaked Toasted Head. Notice the color variance and bubbles.
This is the first of a series of posts in which I will pick some wines for you to taste along with me at home.

For this post, I chose to tackle two chardonnays with the idea of being able to pick out the nuances that oak imparts.  I wanted to work with wines I thought would be readily available in most parts of the country and that didn’t cost a lot of money. I got both at my local grocery store.

We’ll start with an unoaked 2009 Coppola Vineyards Chardonnay. I paid $8.99 for it on sale (normally it’s about $10.99.) It has a bright yellow color and actually has lots of teeny bubbles that cling to the inside of the glass. It has a fruity nose. Sort of a tropically pineapple smell. The first sip is lemony tart with a sort of stone fruit flavor following it. I get peaches. It is well balanced and unoffensive. Nothing really to write home about. It’d be nice on a summer evening, but you can probably find something comparably refreshing with a little more going on. The only memorable thing about it really is its tart, subtly fruity flavor. Meh.

The oaked chardonnay is a 2011 Toasted Head. I paid $9.99 for it, but it is normally $14.99. Its color is a little more goldeny yellow than the Coppola, but it is much clearer and brighter. It has a very, very fruity, sweet aroma. Surprisingly complex- it borders on floral and almost reminds me of a Riesling. It has caramel and vanilla notes as well. It smells pretty oaky. Almost like brown liquor (something I am fond of.)
Its flavor is not sweet (the nose is deceptive) and it has everything that the Coppola had in terms of fruitiness and acid balance, but with much more spicy complexity imparted by the oak. It has a toasty, caramel, almost burnt sugar taste that lingers after swallowing.

I personally don’t always love oaked chardonnay, because it can be too buttery (a stylistic flavor imparted by bacteria, actually...) It isn’t my favorite white wine, as a rule. I had a Sonoma chard last year that was bordering on grassy and tasted like asparagus. Not my thing. However, this one has changed my mind a bit! Anyone who isn’t a big fan of oak won’t like this Toasted Head, as it is pretty strongly oaked (it makes me wonder if they used new oak, or lots of oak dust or chips in processing.) However, if you like brown liquor or enjoy a little spice, you’ll likely enjoy this wine. I think it’d be great with food or alone. If you find it on sale like I did, it’d be worth getting a few bottles to sock away (I’ll be looking out for it.)


These flavors are hard to accurately describe without you tasting them yourselves, so go forth! Taste along and feel free to put your thoughts in the comments!

Did you know?
Chardonnay is one of the most widely planted grape varieties in the world. It is pretty easygoing in terms of viticulture and will grow in many different climates. It is also easily adaptable to a variety of winemaking styles. Consequently, it is hard to pin down just what a chardonnay “should” taste like. You’ll just have to get adventurous and try a bunch! 

2 Comments

Vocab- Ampelography!

4/7/2013

0 Comments

 
Ampelography:
This word was printed in a description on the back of a bottle at one of our recent Wines of the World meetups, and most of us didn't know what it meant. My cursory response was “basically, it is grapevine genetics. The study of the vine.” That’s  pretty much it, in the abridged version. Before we had genetic sequencing, Ampelography started as the study of different physical characteristics from vine to vine, usually focusing on the shape and texture of the plant’s leaves, berry color, etc.  In some cases, the vines really do have very differently shaped leaves (I, a novice, after spending about 20 minutes in WSUs research plots was able to recognize that what was labeled on my map as Chardonnay, was in fact, not. Just based on the shape of the leaves.) However, in other cases, the leaves look pretty darn similar and aren’t useful enough to determine the difference between cultivars (or what we drinkers call “varietals.”)

Today, ampelography encompasses more than just looking at the shape of the vine and its parts and has broadened to include genetic studies as well. Just as with people, genetic sequencing and DNA has solved a lot of grapevine mysteries! (What is known as Primitivo turned out to be what Californians have been calling Zinfandel all along!)


And, now you know! Hopefully this will be on your (or my) next pub trivia questionnaire! 
0 Comments

Wine Kit-Step 3

4/2/2013

0 Comments

 
So last time I said Step 2 was one of the easiest steps. I may’ve misled you. For this particular kit, Step 3 is pretty cinchy. In fact, the only things I needed to clean were my drill mounted mixing device, my strainer, my funnel, my thief, my test tube, and a whole lotta glass marbles.

I mixed up fresh chemicals (mostly because I was almost out of all of them- but it’s not a bad idea to mix up fresh as often as possible,) did my cleaning, and made sure my drill was charged (I left it to charge overnight.) I have a wimpy little Black and Decker cordless drill. It’s served me for 9 years, but it loses battery life fairly quickly.

The purpose of this process is to get as many of the gasses currently suspended in the wine out as we can. So here goes…

According to my kit’s instructions, I added my SO2 and Potassium Sorbate and then got to the degassing. With the mixing rod hooked up to my drill, I pulled up a chair and started mixing away. Now, the kit calls for stirring with the long spoon for 2 minutes, then adding the chitosan, and stirring for 2 minutes.

There is absolutely NO way that this would get the gas out of your wine. No way. Never.

Each time I’ve done a kit, I have added my chemicals, degassed for 6 or so minutes, added my chitosan, and then degassed until my drill dies (somewhere between 10-13 minutes total) and often still had a little bit of gas in my test tube later. It is tricky, because you don’t want to introduce too much oxygen into the wine as this could cause browning. But you really don’t want to have a bottle with leftover carbon dioxide in it either. So basically, I’d say degas at least 10 minutes with the drill, test it in the test tube, and if need be, do some more. How they think you could agitate it enough with a wimpy spoon is beyond me…

Once you feel like there is no longer a little puff of air in your test tube, then you’ve sufficiently degassed it and can move on.

My instructions call for topping up the wine to within 2 inches of the bottom of the bung with water. This is an option, but I don’t know why you’d want to dilute it that much when you just got your Brix (or specific gravity) to the point you wanted. Dave the Awesome came up with a much better solution- and this is where your glass marbles come into play. Make sure you’ve thoroughly cleaned and sanitized your marbles. If you have a funnel, clean and sanitize it as well. I recommend using the smoothest glass marbles you can find (rather than stones or those sort of flattened out glass pieces people often use in aquariums) because you want as few pits and chips as possible- it’ll make keeping them clean much easier.

Add the marbles a little at a time. If you don’t, they’ll get stuck in your funnel. Trust me. Once they’ve displaced enough volume to get the wine to just where you want it, put your (cleaned and sanitized) bung back in, fill the airlock halfway with water, and leave it to settle and clear. This is where the marbles fill their second role. They’ll help collect and trap all of your remaining solids in the bottom of the carboy- which is especially handy when you go to rack it in the next step.

I’ve got mine back in the closet, clearing away. I’ll revisit it in 2 weeks as recommended by the kit.

See? Easy Peasy!

Did you know?

When wine tasting, your palate can actually get fatigued? Yep. Eventually (this will differ from individual to individual, but usually the max is about 6,) you just get tired, your mouth gets dry, and can’t pick out very many nuances. Even professional wine judges know their limits. You can help fight this fatigue by nibbling on crackers and water between tastes. (No, those are not there to keep you from getting drunk in the tasting room- though they may help with that too!) Cheers!

0 Comments
    Wanna receive updates in your inbox?
    Enter your Email:
    Preview | Powered by FeedBlitz

    Author

    I'm a wine-loving actress in the Windy City who holds certificates in Enology and Viticulture from Washington State University. I also own a hilarious cat.

    Archives

    October 2014
    September 2014
    August 2014
    April 2014
    March 2014
    February 2014
    January 2014
    December 2013
    November 2013
    October 2013
    September 2013
    August 2013
    July 2013
    June 2013
    May 2013
    April 2013
    March 2013
    February 2013
    January 2013

    Categories

    All
    101 The Basics
    Alcohol Content
    Grape Growing
    Media/Pop Culture
    Pests And Diseases
    Sugars
    Tasting
    Vocab
    Wine Making

    RSS Feed