UnCorked
  • Home
  • The Blog
  • Who and Why
  • Contact Me

No Kick from Champagne? Maybe You Just Need the Right Glassware… 

3/27/2013

2 Comments

 
There's really no reason for sparkling wines to only be special occasion wines. They're good year-round, alone or with food. And, I don’t know if you’re like me, but I’ve always dreamed of owning a set of those glamorous, old fashioned champagne saucers. You know the ones... The impeccably dressed and styled drinkers are sipping out of them while listening to Cole Porter and gazing out over the black and white 1930s Manhattan skyline… Legend has it that their shape was inspired by a mold of Marie Antoinette’s breast (saucy!)

My storage space is limited, so I’ve never been able to justify buying champagne glasses of any kind. But one day, I got curious. Why don’t you see many of the saucer style glasses nowadays? Why the ever-present flute (tulip or trumpet) shape we’ve all come to know?


I'm not really sure where the preference shifted, it seems to be sometime in the 1960's or 70's (if my online vintage shopping tells me anything.) But, it really does make perfect sense- favoring the flute is a matter of function. The saucers just aren’t a good shape for sparkling wine. All those tiny little bubbles are just dying to rush to the top and make their bid for freedom. The giant bowl of the champagne saucer gives them lots and lots of surface area to make their escape. Whereas, the long narrow shape of the flutes gives them more opportunity to hide out and cling to the bottom of the glass, with far less area to break at the surface. Pretty straightforward.

So, unless you plan on throwing the entire thing back nice and quick (I'm not judging,) your champagne toasts are much better served in our modern flute. However, if you’re in the mood to throw a Casablanca-themed party one of these days, these plastic versions could be a fun, low-commitment substitute (though I should inject that my depression-era grandmother would insist that you wash and re-use them. )
Go right ahead! Play it, Sam!

Did you know?
Sparkling wines today are made in two basic ways. According to the traditional method, the wines undergo a secondary fermentation (in tank or bottle-it varies from region to region) in which the carbonation is not allowed to escape. I'm over simplifying, as it is actually a pretty complex process, but you get the drift. The more modern and sort of “quickie” method is done by the same process by which we carbonate our soda. Yep. Basically, they pull a Sodastream maneuver and inject carbon dioxide into the wine.
You can tell the difference when you pour them in your glass. The traditionally made wines have delicate, tiny little bubbles. Whereas the soda-style sparklers have large, splashy bubbles. If you had one of each side-by-side, it’d be obvious.
2 Comments

Wine Kit Step 2

3/22/2013

0 Comments

 
Picture
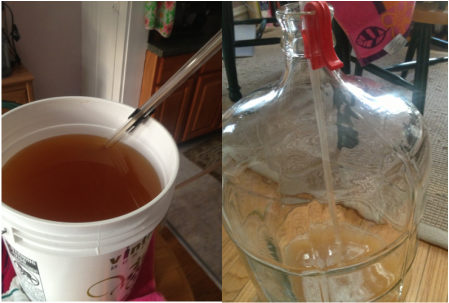
The photo on the left shows another reason to stay with it- you can see that my auto siphon wants to tilt to the side, even with the clip! On the right, you'll notice the wine filling the bottom. Also, see the towels in the background? You'll always want to have plenty of towels ready.
This is one of the easier steps of the process. Again, the most time-consuming part of this deal is cleaning and sanitizing. Don’t skimp!

This is where it is time to get the bottle/carboy washer hooked up to your faucet. It makes cleaning that glass carboy MUCH easier. Be warned though, if you accidentally push down on the little bar that sticks out from it and there's no carboy over it, you’re going to get really wet. You and probably your entire kitchen.

So, get your racking wand, tubing, auto siphon, 6 gallon carboy, bung (yes, it is a bung and it has a hole- get over it,) airlock, hydrometer, and test jar ready cleansed and sanitized. Again, I use all 3 cleaning ingredients on everything. Something I didn’t mention before but probably should- in case it isn’t common sense: wear gloves. Your skin will thank you. Yes, they are food safe chemicals, but they’re still chemicals.

Once you’ve gotten everything all cleansed and sanitized, draw a sample of your juice from your fermenting bucket (again, I skip the thief here because it is easy to scoop a sample out from the top of the bucket- you’ll need the thief once you’re dealing with a carboy.)

How are your brix? Mine were actually very low- a good thing. (Again, follow the recommendation on your kit.) This was the best fermentation I’ve had in terms of not having residual sugar after the primary fermentation.  I’m guessing this has to do with the particular yeast strain in this kit- it did mention that it was an especially dry fermenting yeast (yay!) So I may not wind up playing with acid additions like I’d planned. We shall see how things taste/how the pH turns out.

I also waited 4 days beyond what the kit recommended before this initial racking into my carboy- mainly because I had out of town company and just couldn’t get to it till then. It seems to have worked out well for me. (For those of you following along at home, I did this step on March 7th.)

In order to transfer your wine from your big bucket to your first glass carboy, you’ll need to get the bucket up onto a higher level. I use my kitchen table. I have hardwood floors, so I like to just roll up all the rugs, put my bucket on a towel and pull it into the kitchen. This helps in that A) I am slight of frame, so I don’t have to haul about 8 gallons of liquid across my whole apartment, and B) it helps prevent lots and lots of agitated sloshing in the bucket. Remember, you put bentonite clay into it last time and it has settled at the bottom with the yeast lees (dead cells) and other sediment. You want to leave most of that in the bucket, so you don’t want it all sloshed and mixed back into your wine.

Ultimately, I gave it one big hoist up onto the table and then let it settle for about 15 minutes or so while I got everything else ready to go.

Attach your tubing to the racking wand (the shorter end of it) at one end and your auto siphon at the other. (I actually get this all hooked up when I’m cleaning them at the beginning. That way, I can just siphon cleaning materials out of one container, into a bowl, and then back into the other container again. This thoroughly cleans the inside of your tubing and other equipment with a turbulent force. You’ll still have to clean the outside- obviously.)

With the bucket on the table, set your clean carboy a few feet away on the floor. This’ll help gravity help you-and by keeping it a distance away, will help keep major loops and kinks out of your tubing.

The auto siphon has a clip on it. Set it down in the bucket, clip it to the side, and make sure the tip isn’t at the very bottom. You don’t want to suck all the clay, lees, and sediment into your new carboy. The idea is to leave the sludgiest part behind.

Then take your racking wand, which also should have a clip on it, and slide it down into your carboy, clipping it to the side of the glass lip. (This is visible in the photo on the right above.)


Read More
0 Comments

Noble What?!

3/16/2013

0 Comments

 
As a general rule, rots and infection in the vineyard are considered a bad, bad thing. Depending on the level of infection, they can cause some serious economic damage.

Botrytis Cinera, a fungal infection can be bad news to a viticulturist, but interestingly, infected grapes can sometimes be desirable for their use in dessert wines. In these cases, it is referred to as “Noble Rot.” The difference between spoilage and nobility here really just depends on the weather conditions late in the growing season.

Botrytis loves moisture and therefore, if there’s too much rainfall or soupy, foggy weather while there are grapes on the vine, botrytis can set in. It is a fungus that necrotizes (eats) flesh, but requires a wound to the berry in order to get in. Therefore, it is more likely to really take hold later in the season, once the berries have sugar in them. Birds and insects come into the vineyard, try to snack on the berries, and then if there’s lots of moisture, the botrytis gets in through the little bite marks.

If things then stay wet in the vineyard, there’s going to be a likely problem with the crop as a white hairy layer will cover the clusters of grapes and the fungus will start to eat the berries' tissue. There ARE different ways in which viticulturists will manage and try to prevent botrytis. The specifics depend on whether the vineyard is sustainable (most are heading this way,) organic, or biodynamic.

However, if after the initial infection, the weather dries out, and it is very close to or exactly at the time of harvest, then this can be a perfect recipe for Noble Rot. In this case, the botrytis will suck the moisture out of the berries, thereby condensing the sugars, acids, and other flavor components in the fruit. Some winemakers will ask the viticulturist to let the infected berries hang on the vine for several days so that they dry out even further. Basically, they’re then making wine from semi-raisined grapes.

It makes for very sweet wines with a specific “noble rot” flavor (I think it tastes a teeny bit like subtle acetone- but in a good way,) which is prized as a delicacy.

Some wines made this way (if you’re curious to try them) are Sauternes from France (probably the best known,)
 Tokay from Hungary, Spatlese from Germany, and Ausbruch from Austria. 

Did you know?
On top of yeast (a fungus’) initial alcoholic fermentation, many wines- especially reds- undergo a second fermentation known as malolactic fermentation in which certain bacteria convert malic acid into lactic acid. This lactic acid has a smoother feel and can take the bite off of a too sour wine. 
Fungus, bacteria- yum! 

0 Comments

Getting Started with your Wine Kit

3/11/2013

0 Comments

 
Picture
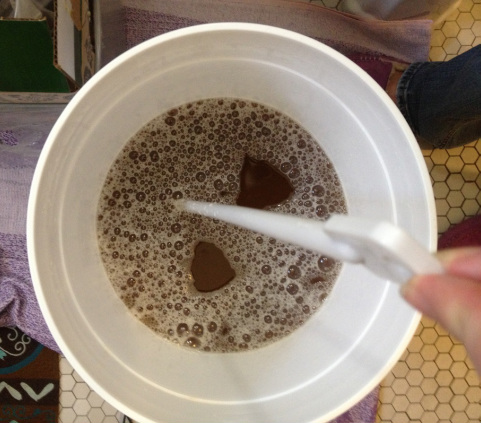
This is about the level your wine should be after emptying and rinsing your bag. You'll need to top it up to 6 gallons. It looks brown and cloudy now, but someday, it'll look like white wine!
Once you’ve got your supplies purchased and ready to go, you can get that wine kit started! I started mine on February 24th (just so you have an idea on the timeline.) As a note, this’ll be a long post, so I won’t be posting the whole thing on the blog page. Be sure to click through to “read more.” It may be a little drier reading than I usually post unless you’re actually trying to follow along at home- or if you’re super curious about the home winemaking process from a kit. 

Step one was to mix up my cleansers and sanitizers in my old vinegar jugs. I recommend just following the recommended dosage from the labels on whatever products you are using. I did one batch of Easy Clean (cleanser,) one batch of Iodophor (another food safe cleaning agent,) and one of the sanitizing agent Potassium Metabisulphite (KMS.) I usually use the powdered version of the KMS, but my local store was out of it, so I used the tablet form. You have to crush them up for sanitizer, so it felt like a little bit of a waste. I still like the powder best. Also, be warned that the fumes from the KMS solution can be pretty potent. You can wind up with some coughing and nose burning if you don’t keep it ventilated well! I usually mix mine up over the bathtub and leave the window open.

Once you’re all mixed up, then you’ll want to use all 3 products on each of your tools.  Be sure to cleanse and sanitize (if scrubbing, use a plastic brush only) the following very thoroughly:
·      Plastic fermenter and lid
·      Mixing spoon
·      Wine thief (this is a cool little tool that lets liquid in when you stick it down in the bucket or carboy, or whatever, but then due to gravity pulling on the pin in the end, doesn’t let the liquid back out till you push the pin back in. It’s the primary tool you’ll use for drawing samples of your juice and wine out through the process.) Truthfully, in this step of the process, I think the thief is optional, but it does make things easier.
·      Thermometer
·      Hydrometer
·      Test tube
You’ll also want to get your de-capper ready.

Read through the instructions for all steps of the winemaking process that are included in your kit. Even if you don’t 100% understand some of the later steps without seeing them, it’s good to read through it all.

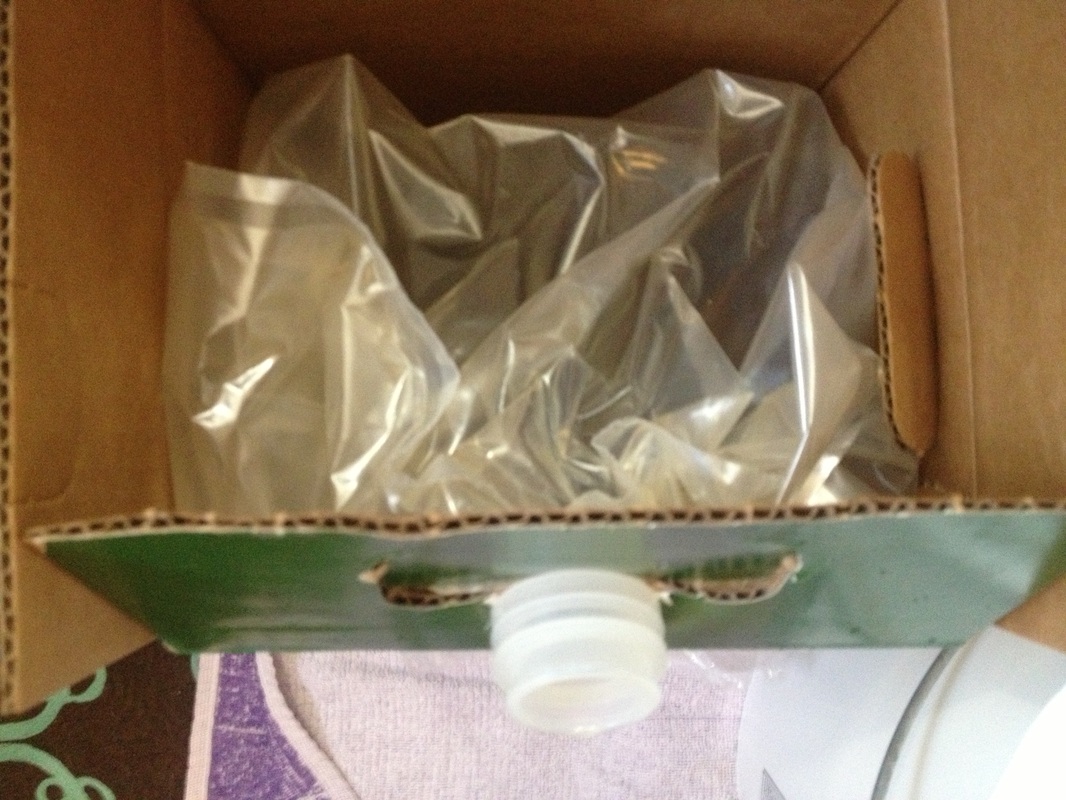
My kit instructed me to empty the juice bag into my primary fermenter, which I carefully did. The trickiest part for me, the first time I did it was getting the neck of the bag to sit properly in the hole in the top of the box, as intended. You can see what it is supposed to look like here:

Picture
At this point, they recommended that I rinse the bag with warm water and dump that into the fermenter as well, just to maximize the juice extracted from the bag. 

Since I knew I’d need water of a particular temperature later in the process anyhow, I decided to boil a kettle of water as well as keep some regular room-temperature water handy. This gave me control later on when I needed to get my juice between 70 and 75°F. I use only filtered water, just to be safe. 

Once my juice was in the fermenter, and I’d mixed in the bentonite clay (I recommend you just follow the instructions here,) the goal was to get the juice up to the 6 gallon mark and get it to the right temperature and sugar level for the yeasties. 


Read More
0 Comments

The Clues are in the Color

3/6/2013

0 Comments

 
I mentioned in a previous post that you can tell a lot about a wine by its color. This is particularly true when evaluating a wine’s age. Once you know what colors are typical of wines at certain stages in their aging process, it can be fun to play detective and check colors for yourself.  (Of course, the lazy route is to just look at the label, but this is a fun way to test yourself- and can actually give you a heads-up if something like oxidation is wrong with your wine.)

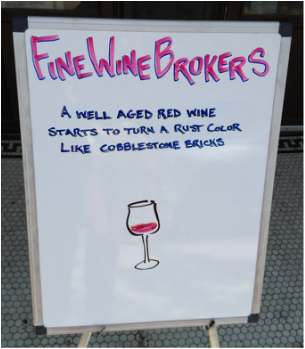
As a fun intro note, I was walking by Fine Wine Brokers in Chicago last year, and at the exact time I was studying wine color in class, they had this sign out front. Serendipitous! 

Picture
Anyhow. Onto the info:
White wines will range in color from anywhere from a yellowy green to a yellowy brown color. I’d say most white wines you find on your grocery store shelf will be somewhere close to the color of pale straw (deeper to paler, depending on varietal, oak usage, and other winemaking techniques.) Very young white wines will have a more greenish tinge, whereas older whites will darken in color, with some dessert wines and Madeiras having a true brown color (Madeiras undergo a heating process that essentially bakes them.)

Here’s sort of a visual of the range of white wine colors you can expect (though remember these colors are definitely more saturated and exaggerated than what you’d find in your glass.)

Picture
Generally, wines that are 1-3 years old will be in the light yellow range (with younger being greener.) Dry white table wines 5+ years old will deepen into a gold or brown color. But as a general rule, this isn't what you want to see in your glass. Don’t let your white wines get that old. Drink ‘em!

Dessert and sweet wines will have a gold color and this is fine.  They can age 5+ years without necessarily passing their peak. Some can age 20+ years!

If  you open a young bottle of white wine and it looks brown, this could mean it got accidentally baked in transit somewhere- likely in a hot vehicle… Oops.

Red wines similarly have a varying range of color based on age. The more purple the wine, the younger it is. Reds that are less than 2 years old will often have this purpley hue. From about 2-4 years old, the wine will take on a nice dark ruby red color. This is the sign of a mature wine. Good and drinkable! The majority of the wine you find on the grocery store shelf is best consumed in this window. (Again, remember that there is room for variance here depending on varietal, so this is a generalization.)

Older wines will take on a brick red or reddish brown appearance, as our friends at the wine shop pointed out above. For many fine wines, this 5-10 year window of brick red coloring is ideal. And for a very select few (those rarities that sell for small fortunes at auction,) they may even take on a deep, rich, fully brown color.

Again, my color chart here is exaggerated, but gives you an idea of the range.

Picture
In order to best evaluate the color of a wine, it is best to have neutral overhead lighting and to hold a plain white piece of paper behind your wine glass. Tip the glass to about a 70 degree angle (don’t slosh!) and look at the color nearest the top edge of the wine. What color is it? (And remember, everyone perceives color differently, so there’s no 100% right answer.)

Now, go forth! Impress your friends with your super-sleuth skills!


Did you know?
In blind tastings, wines are often presented under dim lighting in black glasses. This is because judges can sometimes make accidental educated assumptions about a wine based on its color, before they even take a sip... Sneaky! 

0 Comments

Vocab- Terroir! 

3/1/2013

2 Comments

 
Terroir (crudely pronounced “tehr- wah”) is a word that I’ve heard thrown around a lot in the wine world. It’s also become something of a controversy. And the worst part? It’s kind of difficult to explain- like a word that doesn’t translate well from one language to another… I’m not a philosopher, but I’ll do my best to explain terroir as I understand it.

On a basic, technical level, the word encompasses the characteristics imparted on wine from the immediate environment in which the grapes are grown and the wine is made. The soil, water, sun, slope of the vineyard, moisture in the air, etc. can all be considered part of a wine’s terroir. And, on the one hand, yes. The soil content, nutrients in the water, sun, moisture, etc. all DO affect the health of the vine and the composition of the berries that grow on it. That is true. Science!

However, a sort of mystical shroud has also been pulled over the word, and it has come to represent different winemaking ideologies and philosophies. Large, mass producing wineries are often criticized for eliminating terroir in their wines- for ignoring the characteristics imparted by the specific vineyard and purposefully creating uniform, predictable wines from vintage to vintage (year to year) and batch to batch. For instance, a Kendall-Jackson Chardonnay from 2009 is going to taste pretty much exactly the same as a 2011, which will taste the same as the 2015. Grapes grown from one of their vineyard plots will ideally taste just the same as grapes grown in another vineyard. This is intentional. The winery has branded itself so that you know what to expect when you drink one of their wines. Their viticultural strategy will be aimed at obtaining a higher fruit load on the vines (maximum quantity of juice,) just the right nutrient level (especially nitrogen as it is metabolized by the yeast) and just the right sugar levels at harvest. They want no variation from vineyard to vineyard (they have acres and acres and acres and acres- sometimes from vastly different locations) or year to year. Variation is bad.

In contrast, smaller craft winemakers often appreciate and accept the characteristics that soil, water (drought or abundant rain,) sun exposure, cover crops (other plants growing on the vineyard floor,) etc. can impart into the winemaking process, recognizing terroir down to the individual row or even individual plant in a vineyard. They, like the large scale wineries, want plants to grow well and have the right fruit load, but it tends to be less fruit per vine with these guys- they want the plants to concentrate their energy and nutrients on fewer berries. They too want nutrient levels in a proper range, and will harvest when sugars are right. However, they accept and appreciate the differences that different locales may offer. These wineries may experiment with different yeast strains from year to year. They may play with oak contact or eliminate it altogether, or they may decide to not filter their wines. They tend to not have a perfect "recipe" that they use from year to year. They are more interested in high-quality, interesting, complex wines. In this way, terroir has also come to include the winemaker and the care and influence that they exert during the winemaking process.

Ultimately, in the global wine market, you can compare wines where terroir is to be present in the bottle (small, handcrafted productions) with large-scale wineries whose brand is more important than the uniqueness of their product. This concept is of importance to many European winemakers- especially the French, who want to distinguish themselves in an increasingly global market.  


If I sound mildly hesitant about the terroir hype, it is because I am... And unsettlingly, I can't quite pinpoint why... It may be because the scientific evidence seems to say that while soil, weather, etc. DO play a part in the eventual composition of the berry, and the subsequent fermentation, it does not affect the finished product in such a mystical, spiritual way. Consequently, I'm just not quite ready to bow down at the altar of terroir. 


However, I must admit that it is precisely such a romantic notion that attracted me to wine and winemaking in the first place. I vividly remember a winemaker in Walla Walla pointing out into their estate vineyard and showing us two different hills, each growing the same varietal. They explained that the grapes on one hill tasted extremely different and made vastly different wines because there was more lime in the soil and that they took that into account in the cellar when fermenting and blending. It's fascinating stuff, and to ignore those nuances the way the mass produced wines do seems a real shame. What a waste to ignore the gifts that nature has given you, whether you want to call them terroir or not!

That muddled explanation is the best I can do to try to nail down the slippery meaning of the word. And I'm sorry I can't give you a hard and fast opinion on the subject either. But hopefully, the next time someone sips a white wine with a slight calcium flavor and comments on its "terroir," you’ll be able to keep up in the conversation!

Cheers! 

And remember, (friendly and constructive) thoughts and opinions on the subject are always welcome!

Did you know?
You can keep sparkling wines bubbly for a day or so by putting them back in the fridge. If you have a cork or some other closure, it can’t hurt to use it (and will keep the flavor fresher,) but if not, just stick it back in there and keep it cold. It’ll stay bubbly through at least the next day’s dinner… or dessert.    
2 Comments
    Wanna receive updates in your inbox?
    Enter your Email:
    Preview | Powered by FeedBlitz

    Author

    I'm a wine-loving actress in the Windy City who holds certificates in Enology and Viticulture from Washington State University. I also own a hilarious cat.

    Archives

    October 2014
    September 2014
    August 2014
    April 2014
    March 2014
    February 2014
    January 2014
    December 2013
    November 2013
    October 2013
    September 2013
    August 2013
    July 2013
    June 2013
    May 2013
    April 2013
    March 2013
    February 2013
    January 2013

    Categories

    All
    101 The Basics
    Alcohol Content
    Grape Growing
    Media/Pop Culture
    Pests And Diseases
    Sugars
    Tasting
    Vocab
    Wine Making

    RSS Feed