
This is about the level your wine should be after emptying and rinsing your bag. You'll need to top it up to 6 gallons. It looks brown and cloudy now, but someday, it'll look like white wine!
Once you’ve got your supplies purchased and ready to go, you can get that wine kit started! I started mine on February 24th (just so you have an idea on the timeline.) As a note, this’ll be a long post, so I won’t be posting the whole thing on the blog page. Be sure to click through to “read more.” It may be a little drier reading than I usually post unless you’re actually trying to follow along at home- or if you’re super curious about the home winemaking process from a kit.
Step one was to mix up my cleansers and sanitizers in my old vinegar jugs. I recommend just following the recommended dosage from the labels on whatever products you are using. I did one batch of Easy Clean (cleanser,) one batch of Iodophor (another food safe cleaning agent,) and one of the sanitizing agent Potassium Metabisulphite (KMS.) I usually use the powdered version of the KMS, but my local store was out of it, so I used the tablet form. You have to crush them up for sanitizer, so it felt like a little bit of a waste. I still like the powder best. Also, be warned that the fumes from the KMS solution can be pretty potent. You can wind up with some coughing and nose burning if you don’t keep it ventilated well! I usually mix mine up over the bathtub and leave the window open.
Once you’re all mixed up, then you’ll want to use all 3 products on each of your tools. Be sure to cleanse and sanitize (if scrubbing, use a plastic brush only) the following very thoroughly:
· Plastic fermenter and lid
· Mixing spoon
· Wine thief (this is a cool little tool that lets liquid in when you stick it down in the bucket or carboy, or whatever, but then due to gravity pulling on the pin in the end, doesn’t let the liquid back out till you push the pin back in. It’s the primary tool you’ll use for drawing samples of your juice and wine out through the process.) Truthfully, in this step of the process, I think the thief is optional, but it does make things easier.
· Thermometer
· Hydrometer
· Test tube
You’ll also want to get your de-capper ready.
Read through the instructions for all steps of the winemaking process that are included in your kit. Even if you don’t 100% understand some of the later steps without seeing them, it’s good to read through it all.
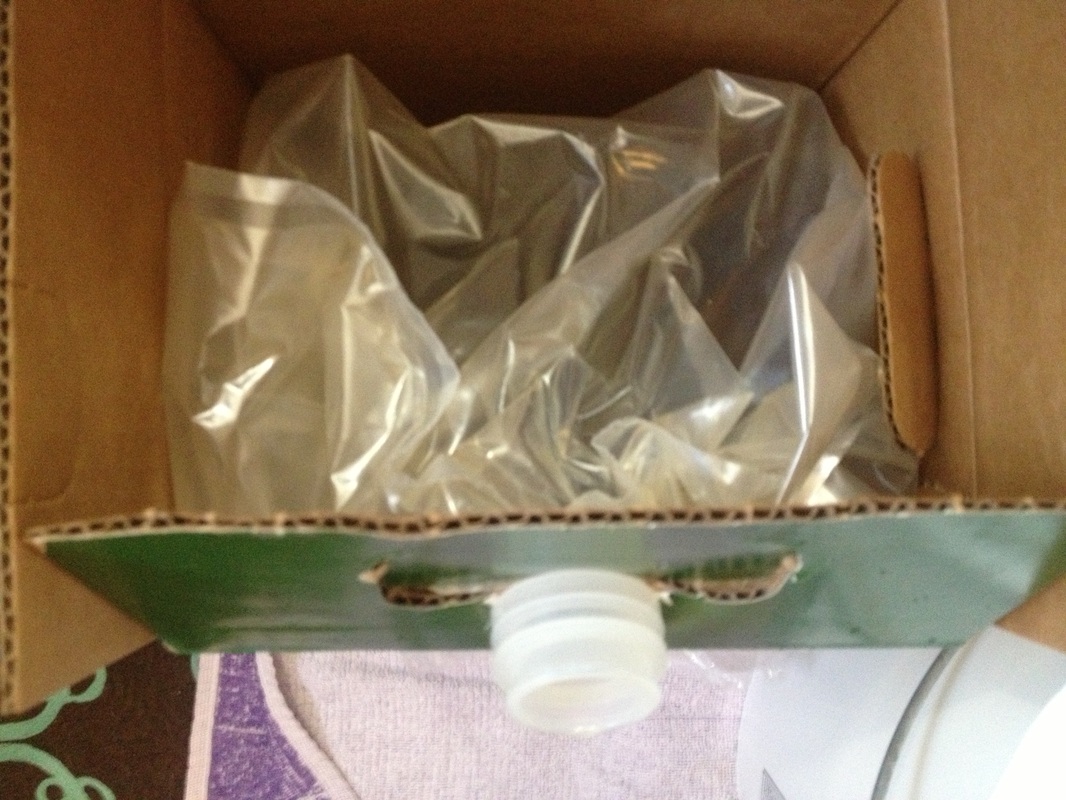
My kit instructed me to empty the juice bag into my primary fermenter, which I carefully did. The trickiest part for me, the first time I did it was getting the neck of the bag to sit properly in the hole in the top of the box, as intended. You can see what it is supposed to look like here:
Step one was to mix up my cleansers and sanitizers in my old vinegar jugs. I recommend just following the recommended dosage from the labels on whatever products you are using. I did one batch of Easy Clean (cleanser,) one batch of Iodophor (another food safe cleaning agent,) and one of the sanitizing agent Potassium Metabisulphite (KMS.) I usually use the powdered version of the KMS, but my local store was out of it, so I used the tablet form. You have to crush them up for sanitizer, so it felt like a little bit of a waste. I still like the powder best. Also, be warned that the fumes from the KMS solution can be pretty potent. You can wind up with some coughing and nose burning if you don’t keep it ventilated well! I usually mix mine up over the bathtub and leave the window open.
Once you’re all mixed up, then you’ll want to use all 3 products on each of your tools. Be sure to cleanse and sanitize (if scrubbing, use a plastic brush only) the following very thoroughly:
· Plastic fermenter and lid
· Mixing spoon
· Wine thief (this is a cool little tool that lets liquid in when you stick it down in the bucket or carboy, or whatever, but then due to gravity pulling on the pin in the end, doesn’t let the liquid back out till you push the pin back in. It’s the primary tool you’ll use for drawing samples of your juice and wine out through the process.) Truthfully, in this step of the process, I think the thief is optional, but it does make things easier.
· Thermometer
· Hydrometer
· Test tube
You’ll also want to get your de-capper ready.
Read through the instructions for all steps of the winemaking process that are included in your kit. Even if you don’t 100% understand some of the later steps without seeing them, it’s good to read through it all.
My kit instructed me to empty the juice bag into my primary fermenter, which I carefully did. The trickiest part for me, the first time I did it was getting the neck of the bag to sit properly in the hole in the top of the box, as intended. You can see what it is supposed to look like here:
At this point, they recommended that I rinse the bag with warm water and dump that into the fermenter as well, just to maximize the juice extracted from the bag.
Since I knew I’d need water of a particular temperature later in the process anyhow, I decided to boil a kettle of water as well as keep some regular room-temperature water handy. This gave me control later on when I needed to get my juice between 70 and 75°F. I use only filtered water, just to be safe.
Once my juice was in the fermenter, and I’d mixed in the bentonite clay (I recommend you just follow the instructions here,) the goal was to get the juice up to the 6 gallon mark and get it to the right temperature and sugar level for the yeasties.
Temperature is pretty important in these next few steps, so get your hot and cold water ready. Getting your wine to around 70 degrees F is good when measuring your sugar levels. If your sample is off from this temperature, you will not get an accurate sugar reading (and the hydrometer you're using isn't highly accurate to begin with, so you want to do your best.)
At this point, my juice was at about 4 gallons in my bucket, so I needed to add water to get it to 6. I added hot water and cold water until it was just about at the 6 gallon mark on the bucket. Then (I skipped the thief, but this is where you’d use it) I dunked my test tube into the wine and drew up an almost full sample. I dropped my hydrometer in and gave it a spin, waiting for it to settle and float so I could get a reading on the sugar.
Your hydrometer is measuring specific gravity. But in winemaking we talk about sugar concentration in terms of degrees Brix.
Your hydrometer should have readings for both of these numbers, though your wine kit instructions may only deal in terms of specific gravity, just for simplicity’s sake. I can’t help but think in terms of Brix, since that’s what I learned in all of my classes, and it is the language used in wineries (and the juice industry for that matter.) I'll be discussing things in those terms. Deal.
At this point, where my wine was at 6 gallons and roughly 70 degrees F, it measured at only 15 degrees Brix. This is VERY low. When winemakers harvest grapes, they aim for about 22 degrees Brix, and some like it even higher. This low reading has been true of every wine kit I’ve done thus far, and DtA (remember him?) confirmed that this was his experience as well. At 15 Brix, there is a chance that your yeast will not even be able to finish their fermentation and you’ll wind up with a sweet tasting, watery, low alcohol, weird wine.
I added a total of 1 cup cane sugar in ½ cup increments, stirring and retesting after each addition to check my Brix (you may not need any or that much. Be sure to do your hydrometer readings!) After 1 cup, it was up to 20 degrees Brix, and I felt confident it could finish fermentation. I added my yeast according to the instructions (you don't stir or anything, just sprinkle them on the top.)
At this point, I put my lid on tight, filled my little air lock halfway with water (these things are neato. The water in them means that CO2 can get out of the bucket through the tiny vent, but no bacteria or bad stuff can get back in- the way they would if you were leaving the hole exposed to air) and then I hauled the bucket into the closet to let it do its thing.
About 2 days later, my apartment was filled with a sweet, yeasty aroma, and the little airlock was bubbling away- a sure sign that things are going as they should!
I’m going to let it go about 10 days (the instructions call for 5-7, and I’ll definitely check on it in 7, but if there’s still happy bubbling going on, I’m going to let it be- and my experience has been that it needs more like 10 days) and then I’ll hopefully be ready to move onto the next step!
Happy fermenting!
Did you know?
For a long time in human history, wine was considered one of the safest things to drink because pathogens can’t live in it! It wasn’t until Louis Pasteur came along that water and milk became common beverage staples. However, there is speculation that wine quality was far less important than its quantity. It was often drunk young (yes, also by children, but I really meant in early in the life cycle of the wine.) If it wasn’t, it likely was pretty vinegary by the time it was consumed. Mmm. But I guess vinegar wine beats giarda!
 RSS Feed