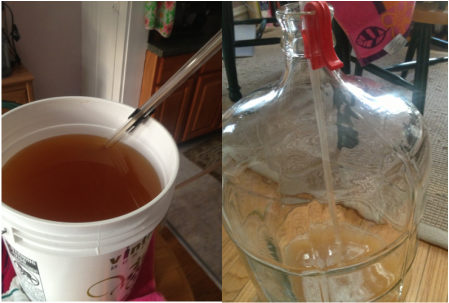
The photo on the left shows another reason to stay with it- you can see that my auto siphon wants to tilt to the side, even with the clip! On the right, you'll notice the wine filling the bottom. Also, see the towels in the background? You'll always want to have plenty of towels ready.
This is one of the easier steps of the process. Again, the most time-consuming part of this deal is cleaning and sanitizing. Don’t skimp!
This is where it is time to get the bottle/carboy washer hooked up to your faucet. It makes cleaning that glass carboy MUCH easier. Be warned though, if you accidentally push down on the little bar that sticks out from it and there's no carboy over it, you’re going to get really wet. You and probably your entire kitchen.
So, get your racking wand, tubing, auto siphon, 6 gallon carboy, bung (yes, it is a bung and it has a hole- get over it,) airlock, hydrometer, and test jar ready cleansed and sanitized. Again, I use all 3 cleaning ingredients on everything. Something I didn’t mention before but probably should- in case it isn’t common sense: wear gloves. Your skin will thank you. Yes, they are food safe chemicals, but they’re still chemicals.
Once you’ve gotten everything all cleansed and sanitized, draw a sample of your juice from your fermenting bucket (again, I skip the thief here because it is easy to scoop a sample out from the top of the bucket- you’ll need the thief once you’re dealing with a carboy.)
How are your brix? Mine were actually very low- a good thing. (Again, follow the recommendation on your kit.) This was the best fermentation I’ve had in terms of not having residual sugar after the primary fermentation. I’m guessing this has to do with the particular yeast strain in this kit- it did mention that it was an especially dry fermenting yeast (yay!) So I may not wind up playing with acid additions like I’d planned. We shall see how things taste/how the pH turns out.
I also waited 4 days beyond what the kit recommended before this initial racking into my carboy- mainly because I had out of town company and just couldn’t get to it till then. It seems to have worked out well for me. (For those of you following along at home, I did this step on March 7th.)
In order to transfer your wine from your big bucket to your first glass carboy, you’ll need to get the bucket up onto a higher level. I use my kitchen table. I have hardwood floors, so I like to just roll up all the rugs, put my bucket on a towel and pull it into the kitchen. This helps in that A) I am slight of frame, so I don’t have to haul about 8 gallons of liquid across my whole apartment, and B) it helps prevent lots and lots of agitated sloshing in the bucket. Remember, you put bentonite clay into it last time and it has settled at the bottom with the yeast lees (dead cells) and other sediment. You want to leave most of that in the bucket, so you don’t want it all sloshed and mixed back into your wine.
Ultimately, I gave it one big hoist up onto the table and then let it settle for about 15 minutes or so while I got everything else ready to go.
Attach your tubing to the racking wand (the shorter end of it) at one end and your auto siphon at the other. (I actually get this all hooked up when I’m cleaning them at the beginning. That way, I can just siphon cleaning materials out of one container, into a bowl, and then back into the other container again. This thoroughly cleans the inside of your tubing and other equipment with a turbulent force. You’ll still have to clean the outside- obviously.)
With the bucket on the table, set your clean carboy a few feet away on the floor. This’ll help gravity help you-and by keeping it a distance away, will help keep major loops and kinks out of your tubing.
The auto siphon has a clip on it. Set it down in the bucket, clip it to the side, and make sure the tip isn’t at the very bottom. You don’t want to suck all the clay, lees, and sediment into your new carboy. The idea is to leave the sludgiest part behind.
Then take your racking wand, which also should have a clip on it, and slide it down into your carboy, clipping it to the side of the glass lip. (This is visible in the photo on the right above.)
Now, lift the plunger in the auto siphon, push it down- you may have to do this two or more times, and watch your wine flow from the bucket up through the siphon, the tubing, down through the racking wand, and into your glass carboy. It’s pretty satisfying.
Now, this part actually gets boring, and it’d be tempting to just walk away and let it do its thing, but your really do have to watch it. Especially the siphon end. Your goal is to get as much liquid out of the fermenting bucket as possible, while still leaving your thickest, murkiest sediment behind. So you have to watch and keep lowering the end of your siphon into the juice as you get toward the bottom, but make sure to watch the liquid going through the tubing- you don’t want it getting too murky.
Once you feel like you’ve gotten the most you can get without too much sludge, pull the siphon up out of the bottom of the bucket, unclip the racking wand, and voila!
Put the cleansed and sanitized bung into the top of the carboy, fill your airlock halfway with water, and move her back to wherever your spot is. Mine’s the front hall closet, so I shift it back onto a towel and drag it back across the apartment. It shines the floors- bonus!
Now make sure you clean and sanitize all your equipment again. It may feel like a waste of chemicals, but it is worth it. The last thing you need is juicy bits stuck to the insides of your tubing growing special bacteria, mold, fruit fly larvae, or whatever in the next few weeks before you use them again. Don’t do it. Clean and sanitize everything before and after each use. Don’t be lazy! Laziness=problems in winemaking.
During this next phase your wine is undergoing what the kit calls “secondary fermentation.” From what I can tell, this is a little bit of a misnomer. Normally when winemakers refer to secondary fermentation, they are referring to Malolactic Fermentation-a process that requires the addition of bacteria that turn malic acid into lactic acid. Since my kit's yeast packet didn't specify that it also had malolactic bacteria included, I find it doubtful that this is what is really going on. Furthermore, the practice of adding the ML bacteria at the same time as the yeast fermentation is a little controversial (though the academic papers I've read show it is actually a good idea) so I'm sure that’s not the case here.
From what I can assume, the secondary fermentation process for the kit here serves to give any remaining yeast cells a chance to eat up any remaining sugars, as well as to get the wine off of the lees. Lees can impart an unwelcome toasty complexity in some white wines (it is actually a welcome flavor component in many wines, but not so much in a pinot blanc) so it may be best to get them out of there. It’ll also give the wine a chance to let off more CO2, which is good, as it’ll make the next step easier.
OK. That’s it! Let it go! Let it “secondarily ferment” and I’ll see you back in a few weeks (depending on your kit!)
Did you know?
When talking to someone from France, DON’T call all sparkling wine “Champagne.” In France, only sparkling wines produced in the Champagne region may be labeled as such. They hate that we’ve coopted the term and that some US winemakers refer to their sparklers as Champagne… it really sticks in their craw, so to speak.
 RSS Feed